11.World Machine专业版附录
专业版包含针对可视化和游戏开发行业的附加功能。其中一些新功能是显而易见的;你使用的World Machine和以前一样除了额外的一些功能.
明显的改进
64bit支持
工作站运行64bit Windows Xp或Vista可以使用64bit World Machinede的执行程序。这将会移除经常遇到的2GB 32bit内存地址限制,并允许World Machine利用你的工作站包含尽可能多的内存.
大规模多线程
多核处理器巨大的性能改进大大提高了速度和可用性,World Machine专业版支持最多16个处理器对在正常使用的和瓦片创建。此外,它们被用来加速布局和资源管理器视图中的视图,大大减少了时间.
(请参阅9.1节配置允许线程的数量)
瓦片
平铺的地形是一个简单的地形,存储在许多个文件中而不是一个单一的大文件。文件被指定,在逻辑上互相类似。这将是有利于的,原因是一些显示引擎可以为页中的单个文件和内存来提高性能,并在共享环境中单独展示和在单独的文件中运行.

然而最重要的,实际的分辨率限制为单个的高度场,在 World Machine中大约是8192x8192;即使使用单个文件大小或更大的64bit系统也会变得非常难处理。拼贴提供了一种解决此问题的方案。 通过保存地形为矩形的单个文件设置,你可以导出广阔的地形在没有限制的分辨率地形.
World Machine 专业版支持无缝瓦片地形的使用;你不用担心单个文件,相反你将瓦片设置作为一个整体来绘制地形。瓦片地形支持不限制导出;你可以通过完成周围瓷砖的地形数据集,允许你直观简单的运行成百上千万兆字节的数据集文件.
瓦片导出
有三个导出瓷砖地形所需的步骤:
1. 下面描述的是瓦片导出参数设置.
2.为每个你要输出的导出启用瓷砖导出.
3. 从工具栏或菜单中选择Tiled Build动作开始创建.
我们会遵循每个必须的顺序步骤导出.
步骤1:瓦片导出参数
通过项目设置对画框的第三个面板设瓦片输出步骤置:
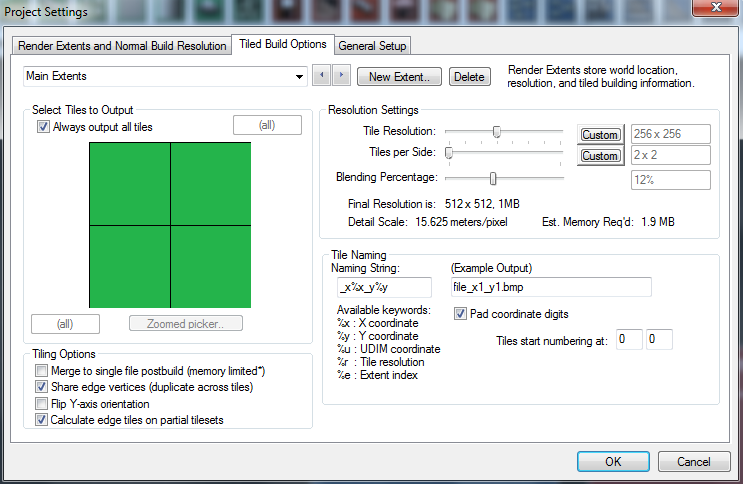
你去创建时设置一个渲染范围;默认情况下它将始终使用当前设置的渲染范围,当瓦片始终执行一个特定的渲染范围时你可以重写此行为.
瓦片输出子集你可以有选择的导出少于整个瓦片设置的地形;这个非常有用,如果你只能修改你的世界的某些地区并希望只覆盖那些特定的瓦片时.
分辨率设置● 瓦片分辨率:每个瓦片的分辨率。你可以使用滑块来选择一个幂数的大小,或单击自定义按钮以输入自定义的瓦片大小.
● 瓦片的每个面:导出瓦片每个面的数量。每一个瓦片面的数量决定最终的瓦片分辨率.
● 混合百分比:混合百分比控制为每个瓦片的创建附加数据,以使强固瓦片的边缘地形之间,请参阅"Potential Tile Issues(潜在的瓷砖块问题)"下面的详细信息.
瓦片选项● 分享边缘顶点:此选项控制如何处理边缘穿过的瓦片。当共享时,边缘顶点被选中,每个块的边缘将具有相同的值作为每个相邻的瓦片的边缘。这允许任何的网格创建从他们互相相对.
● 输出合并到单个文件:选中此选项时,World Machine将尝试所有的瓦片合并到单个文件。使用这种功能主要是受可用内存的限制,因为它需要能够一次分配整个容器文件。如果失败,则将导出像普通的瓦片砖.
● 翻转Y轴方向:反转每个瓦片的Y轴;在一个坐标系之间转换时,Y向下而不是向上增加.
瓦片命名的字符串瓦片设置里坐标位置被追加到文件名里。瓦片生成期间,瓷快的坐标命名字符串追加到输出文件名。你可以控制字符串的关键字:
| Keyword | Action |
|---|---|
| %x,%y | 分别插入X或Y坐标到名称 |
| %res | 插入瓦片分辨率到到名称 |
默认名称字符串是 : _x%x_y%y
使用字符串的一个例子:
你在输出文件中设置 :test_output.png
标准创建导出:test_output.png
将要导出创建的瓦片: test_output_x5_y9.png,在瓦片设置的(5,9)位置。
当命名瓦片时,有几个附加的选项:
● 前导坐标数字:这个参数用于确定是否应前导零坐标数字。例如,在30x30的瓦片设置里:
○ 边距检查: test_output_x08_y15.png
XML Scripts○ 边距不检查: test_output_x8_y15.png
● 瓦片开始编号:瓦片从开始的计数。通常0或1。
步骤2:启用瓦片导出
每个输出都是在你希望保存到在瓦片导出必须启用这一目的上。为此,请访问问题中的输出的属性页。下面是高度场输出的示例。
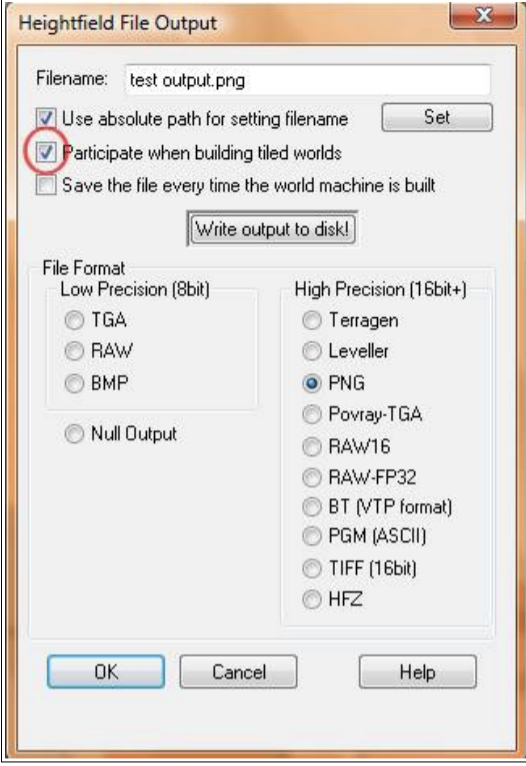
确保"Participate when building tiled worlds(在创建时,瓦片参与世界)"复选框处于启用状态,并且你已经设置文件名和类型。
步骤3:创建世界
从工具栏或菜单中选择瓦片选项来开始创建。将出现一个确认对话框,显示你启用的输出在上述步骤中:
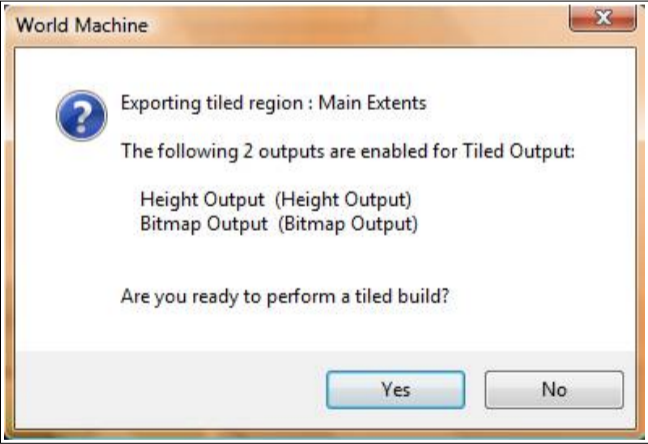
单击Yes将开始生成。 该瓦片设置将导出到同一个文件夹来作为单个文件在标准创建期间产生
瓦片潜在的问题
有一个重大的潜在问题应注意对于瓦片输出的处理上。某些节点,包括基于模拟的节点,如侵蚀和雪,可以产生不同的结果在瓦片模式与正常版本中。原因是与上下文相关的这些算法的性质;平铺时,从瓦片地区之外,他们没有对信息的访问。
World Machine弥补了通过在瓦片周围建立一个额外的地区,然后混合瓦片在"Merging"构建阶段之间。你能控制这个"混合百分比"滑块在瓦片输出设置里。一般来说,光侵蚀的地形可以使用很小的混合,而有大量的差异遍及的地形将需要更多的混合。
瓦片导入
导入瓦片地形设置完成这个周期的功能,允许对数据流往返在World Machine和其他软件中。瓦片的文件输入节点的影响在于它的整个地形设置映射到空间中的用户定义区域。从那里,你可以运行分配你想要的大或小的瓷砖地区。此外,由于瓷砖的文件输入仅仅是你的world machine工作流程里的另一个节点.如你所愿,你可以有很多输入流,允许你用很多可能的重叠的瓦片数据集,或导入纹理。
从工具栏中选择瓦片文件输入节点放置到世界中:

编辑属性会弹出以下对话框:
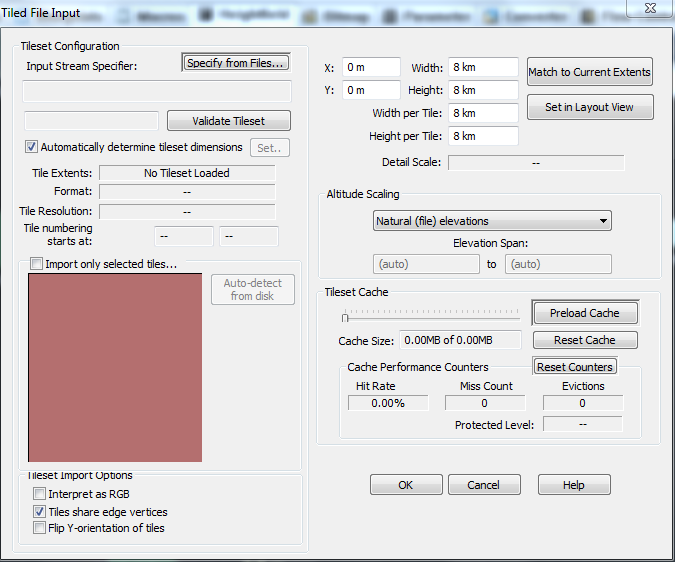
建立地形设置输入流
一旦你点击"Specify Input Stream(指定输入流)",会出现下面的对话:
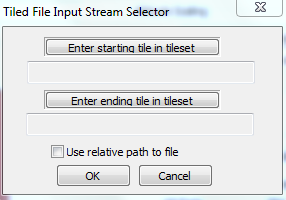
通过指定两个瓦片在你要导入的瓦片集的内部,World Machine将在使用瓦片坐标时尝试确定命名方案。一般来说,只要确定在瓦片内部每块瓦片是一个离散的坐标,它将能够分析出命名规则.
默认情况下,World Machine将确定总的瓦片设置的程度,即使他们在这两个你指定的文件以外;例如,即使您选择了"tile_3_1"和"tile_5_2",World Machine会搜索所有其他匹配的瓦片和确定自己的全部设置.
有两个额外的可用选项在指定的输入数据集:
● 只导入所选子集:如果你选择此选项,只有瓦片之间的选定将被导入。在上面提到的例子中,这个检查,只有瓦片瓦片之间的矩形区域(3,1)和(5,2)将被导入.
● 使用文件的相对路径:允许你查找数据集的相对路径,而不是绝对的。如果数据位于下面的文件夹中的项目设置中指定的位置,路径将存储为相对路径;否则会保持绝对的.
一旦你选择了tilestream,World Machine将尝试验证瓦片设置来确定瓦片设置的程度,并确保每一个瓦片存在.
建立世界空间的位置
右上角的对话框允许你指定瓦片设置空间应设在哪里。你可以设置整个瓦片区域的位置和大小,或设置每个瓦片的大小,让WM为你计算总大小。如果你愿意,你可以以图形设置位置通过单击"Set in Layout View(布局视图中设置)"按钮.
设置你文件的海拔
有几种方法可以绘制瓦片设置的的海拔到世界:
● 自然海拔:确保输入文件中的高度值被转换成World Machine上的相同海拔
● 全方位:海拔地图呈现以便最高和最低海拔跨度完全可能在World Machine范围内
● 说明:指定高度范围之间的输入数据应该落在(米).
在高度值映射之后,超出范围的任何高度将被剪切到允许的最小和最大高度.
瓦片设置选项
您可以设置瓦片输入选项,包括:
● 解译为RGB:在切换期间,瓦片输入节点会产生一个位图输出,而不是高度场的输出.
● 共享边缘顶点:如果World Machine假设每个瓦片的边缘匹配。当此选项设置不正确时,会有一个瓦片设置中的一个像素偏移;检查导出选项从World Machine瓦片数据或其他资源,看看此属性应设置为什么.
● Y轴翻转:启用这个,如果你的瓦片数据导出的每一个瓦片使用左上角的资源,而不是左下方;你将会知道,因为每个瓦片以正确的顺序而不是颠倒的.
性能调整
瓦片文件输入节点使用多重分辨率缓存来制定你的瓦片简单设置。默认设置通常会实现最佳性能;但是,你可以调整分配给缓存的空间总量,如果你想满足一组非常大的瓦片.
自动化
World Machine专业版支持一个简单但是有用的形式,使用基于xml的脚本自动化。这允许你从命令行加载、构建、导出和修改所有基本设置.
你可以用两种方式运行自动化:
1. 从World Machine GUI中,选择"Run Automation Script...(自动化脚本运行..)"从文件菜单中:
2. 从命令行通过拖拽一个WM脚本到可执行文件上,或运行World Machine脚本文件的名称作为参数.
简要介绍XML
对于那些不熟悉XML标记语言的来说,它非常类似于HTML。你通过使用标记来表示和标记创建XML文档。然而与HTML不同的是,应用程序定义其自己的标记;标记你定义确定什么数据文件。标签是分层的并可能包含子标签,通过定义新标签<>标记之间。标签可以有任意数量的参数
<MYTAG> ... </MYTAG>是一个有效的XML标记
<mytag1> <mytag2> </mytag2> </mytag1> 是一个有效的XML结构标签;mytag1是mytag2的父标记.
<mytag name="My.. tag..." action="none" /> 是一种有效的单标签XML标签,具有两个参数,name和action.
The tag <!-- ... --> 是一个注释标记。 你可以插入任何文本..。通过XML解析器后这个区域将被忽略.
World Machine XML脚本
总是开始脚本文件使用XML头声明.
<?xml version="1.0" encoding="UTF-8" standalone="no"?>
在标头之后,有且仅有一个根标记,在这个案例中使用automation容器标记.
这行命令标签内部被处理和执行.
主要有三种类型的命令,您可以执行一个脚本文件:
1.Worldfile行动:加载或保存一个世界文件(TMD)。每个脚本必须包含一个从磁盘加载命令的worldfile.
2.改进:在世界内部改变一些事情。最常见的修改是更改输出分辨率,或者启用/禁用节点或节点组.
3.创建/导出:实际执行生成过程和导出文件.
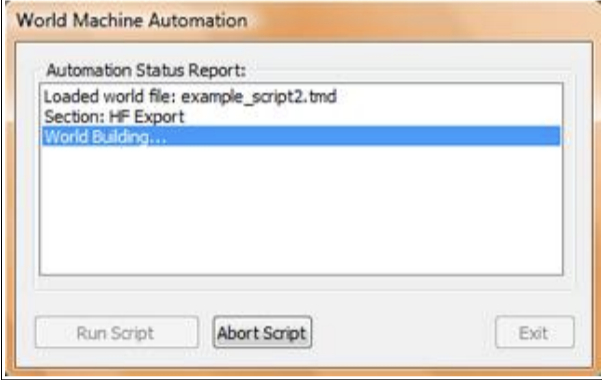
一个脚本例子
下面是一个示例脚本。 标记大多数标签都一目了然;可用标记的完整列表在下面一节.
<!-- -->
<!-- Example World Machine Pro script file. These
files are in XML format -->
<!-- The example_script2.tmd file is setup to allow us
to quickly change what outputs we're using to export a
low-res mesh and a high-res normalmap.
<!-- -->
<!-- XML header declaration -->
<?xml version="1.0" encoding="UTF-8"
standalone="no"?>
<automation version="WMP2">
<!-- Load a TMD file into WM-->
<load file="example_script2.tmd"/>
<section name="HF Export">
<!-- Set the resolution to 512,enable the output group
named A,then build and export the world (this builds
the normalmap) -->
<modify>
<world res="512" />
<enable group="A" />
<disable group="B" />
</modify>
<build mode="normal"/>
<output/>
</section>
<echo text="Group changover,and re-build for mesh
export"/>
<section name="Mesh Export">
<!-- Set the resolution to 64,enable the output group
named B,then build and export the world (this builds
the mesh) -->
<modify>
<world res="64" />
<enable group="B" />
<disable group="A" />
</modify>
<build mode="normal"/>
<output/>
</section>
<echo text="Example Script Completed"/>
</automation>
World Machine 脚本标签:General
Tag: <automation> ... </automation>
Parameters:
● version ("WMP2")
此标记是WM自动化脚本数据的父容器。版本参数必须始终等于"WMP2",这是当前World Machine v2.0专业版定义的.
Tag: <section name="" enable=""> ... </section>
Parameters:
● name ( = string )
● enable (= "true"|"false"|"yes"|"no" )
这部分标记是逻辑部分,允许你组合在一起的命令设置进入。你能说出每节,并启用/禁用通过更改启用参数。禁用部分脚本将在解析期间跳过.
其他重要的部分标记功能是本地化失败。如果任何主要的命令(例如。 )失败,该命令将中止消息传播,直到它到达部分标记或根容器。因而没有部分,任何一次失败将终止脚本。在一节内,只有该特定部分将中止;其他部分将继续处理,通常都是预放的目的.
Tag: <echo text=""/>
Parameters:
● text (= string )
此标记反应脚本的输入输出显示的文本字符串。它没有其他影响.
Tag: <load file=""/>
Parameters:
● file (= file path )
从磁盘加载世界文件(TMD)。 你可以指定一个绝对或相对文件路径.
Tag: <save file=""/>
Parameters:
世界保存文件(TMD)到磁盘。 你可以指定一个绝对或相对文件路径.
Tag: <build mode=""/>
Parameters:
● mode (= "normal"|"tiled" )
这个非常重要的标记生成当前加载的世界。注意如果在生成期间,他们通常会在WM内,输出文件将只能在这一点上--这意味着你的文件输出节点必须具有"Save file every time the world machine is built(保存文件每次建立了世界上机)"检查来保存,在一个正常的生成.
模式参数控制是否执行一个单文件或瓦片被构建。生成类型使用适当范围&世界文件的分辨率设置.
Tag:<output/>
Parameters:none
在世界创建被完成后可以调用,则此命令将导出文件从当前启用的所有输出.
除非你的文件输出有"Save file every time" checked(保存文件每次)"检查,这是唯一的方法对于导出文件从你的正常生成模式的脚本中!
World Machine 脚本标签:Modifcation
World Machine支持一个更高级的功能-修改世界节点的状态从脚本文件中。世界modifcations都包含在一个特殊的容器标签内。在内部,各种modification标签允许启用或禁用节点,更改世界分辨率或渲染扩展,等等。通过你思想设计控制世界中的文件与脚本,修改节和你应该能够控制任何你希望从脚本文件中的变量之间(11.3.6节所述).
Example use of the Modify
Container
<modify>
<world res="512" use_extents="1" />
<enable group="A" />
<disable group="B" />
</modify>
Tag: <modify></modify>
Parameters: none
The tag <modify> 标签包含所有的预期的其他命令的世界设置。它必须载入所有modifcation标签.
Tag: <world />
Parameters:
● res ( = 该值指示世界创建的分辨率 )
● use_extents ( = 该值指定要使用哪个渲染范围:从零开始,这些对应于它们列出的顺序在项目设置对话框内)
The tag <world> 修改当前世界设置的项目文件。你可以更改创建的分辨率和渲染范围使用于任何正常创建的命令.
Tag: <extent></extent>
Parameters:
● index ( = 要修改的渲染范围数)
The <extent> 标记使你可以修改现有的世界渲染范围。通过添加可以控制规格程度的子元素。以下三个标签是唯一有效的在一个区块中.
Extent Tag: <location> x0 y0 x1 y1 </location>
某种程度上是由提供渲染矩形的四个角的位置值序列指定作为公里。字符串将如下所示:
<location> 0 0 12 12 </location>
指定扩展从世界范围 (0,0) to (12km,12km).
Extent Tag: <resolution>value</resolution>
分辨率是由单个整数值指定:
<resolution>2096</resolution>
Extent Tag: <name></name>
通过使用名称标记一个名字可以给一个特定的渲染范围上。当一起使用时,一个完整的呈现标记可能看起来像:
<modify>
….
<extent index=”2”>
<location>0 0 12 12</location>
<resolution>4096</resolution>
<name>Overview Extents</name>
</extent>
...
</modify>
Tag: <tile />
Parameters:
● res ( = 整数值,该值指示每个瓦片创建的分辨率 )
● number ( = 给瓦片导口的数量值 )
● use_extents ( = 该值指定要使用哪个渲染范围:从零开始,这些对应于它们列出的顺序在项目设置对话框内)
The <tile /> 标记修改瓦片创建的项目设置。你可以更改瓦片分辨率,瓦片数,和渲染范围被用于任何瓦片创建命令.
Tag: <enable />
Parameters:
● device ( = string )
● group ( = string )
此标记允许你启用任何禁用的单个节点或节点组。你必须指定确切名称(区分大小写)中的节点或组的问题。仅指定一个节点或一组,但不能同时每一个命令都启用.
Tag: <disable />
Parameters:
● device ( = string )
● group ( = string )
此标记允许您禁用任何已启用的单个节点或节点组。您必须指定确切名称(区分大小写)中的节点或组的问题。仅指定一个节点或一组,但不能同时每一个命令都启用.
World Machine 脚本标签: Variables
变量允许你从脚本中的值传递到节点设置在deviceworld的影响。例如,你可以控制侵蚀,梯田的数量,颜色混合的数额,或无限的其他设置.
你把一个变量连接到所控制的节点参数通过以下这些步骤:
1. 创建一个<var> 标签 标记<variables>内部提供名称和浮点变量值在定义的参数中.
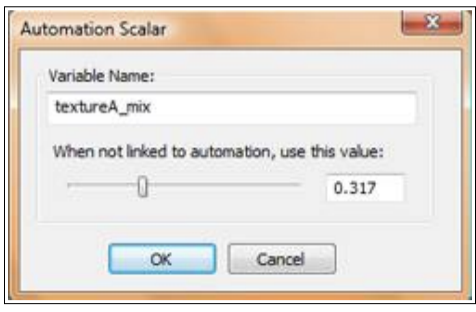
2.创建一个"Automation Scalar(自动化标量)"节点参数和设置"Variable Name(变量名)"字段上面的变量的名称在节点世界中.
3.自动化标量允许你在想控制的节点上输出节点连接到输入参数(s).
Example use of Variables in the
Script file
<variables>
<var name="erosion" value="0.6"/>
<var name="textureA_mix"
value="0.1"/>
<var name="textureB_mix"
value="0.55"/>
</variables>
Tag: <variables> ... </variables>
Parameters: none
<variables>标签是一个变量容器. 所有的 <var> 标签必须被定义在 <variables>内部节块上.
Tag: <var name="var1" value="0.1"/>
Parameters:
● name ( = string )
● value ( = 浮点值)
命令标签允许您定义一个变量。 每个变量必须有两个参数定义:变量名及其值。必须定义变量在脚本文件中的一节内.