9.宏
什么是宏?
实质上,一个宏是一个单一的节点。它抓取了整个World Machine节点的网络的功能。宏包括内部微距的世界,宏是有一个内部的微观世界被连接通过端口连接外部的世界。
用户创建的宏,可以保存并在其他用户之间交换,基本上提供了一个简单的方法来封装和交换一些有用的效果。宏被参数化时尤其有用,他们可以包含选项,控制和参数,就像任何其它你可以置到网路的节点一样。非常强大的宏可以创建自定义编程节点插件。
使用宏
安装一个宏
宏系统的设计旨在使您可以轻松地将其组织为所需的任何层次结构。为此,只需将WM安装的文档文件夹中打开World Machine Macro文件夹(/macros)
现在,您可以创建子文件夹,并使用Windows资源管理器在它们之间拖放宏!您的更改将在启动时反映在World Machine中
插入一个宏到世界
添加一个宏到你的世界里是很简单:在菜单栏中,选择 Heightfield Operators->;Load Device from Library。您将看到一个你的机器上安装的宏的列表。

单击一个宏在右边显示有关它的详细信息,如作者、适用于那个WM版本,宏的描述。在你选择了所需的宏之后,只需单击OK选择宏。此时该面板是活动节点就像如果你点击工具栏中的节点。工作视图中的任意位置单击以放置该宏节点。
在你的节点世界中,宏的表现完全就像任何其他节点。他们必需有可选的输入端口,可以调整的参数,依此类推。

创作宏
创建宏
你可以使用两种方法来创建宏。
1)您可以创建一个空白的宏。 要执行此操作,请执行命令Heightfield Operators->;Utilities->;Blank Macro,然后单击工作视图。该宏将默认为没有端口和任何内部节点-这是一块空白的块,你可以去自定义。
2)可以将现有网络的部分存在的节点转换为一个宏。如果您已经创建了一个特殊的效果,你想保存并在以后使用的话,这个选项是特别有用的。

为此,请选择一个或多个节点,然后右键单击其中之一,然后从弹出的菜单中选择"Create Macro(创建宏)"。选定的节点将被放置在一个新的宏里,并创建宏节点上的端口,以便在内部节点的所有链接不改变整体网路的功能。
内部宏

一旦你通过任何方法宏创建了宏,你可以进入宏世界里面对其进行编辑。有两种方法可以做到这一点:
● 你可以编辑宏通过右键单击并选择"Edit Macro Components(打开宏编辑)"。
● 然后,你可以双击宏并选择"Enter Macro(输入宏)"。
这样做会大大改变工作视图。外部节点网路是看不到的!相反,你看到一些新的陌生的节点,再加上一些节点,你可以通过9。2。1章节的转换为一个宏。
不用担心,外面的世界不是真的。相反,WM现在显示的是你的宏节点内部。选项卡标签将出现在工作视图的顶部,显示你正在编辑的世界。

你可以通过单击选项卡来更改从宏外到宏内部;右键单击选项卡将关闭该宏的视图。
宏可以有更深的一层,你也可以使用由宏组成的宏,包括更多的宏。你可以"tunnel"出只要你想要的。

在所有的宏内部有四个固定不变的节点。他们无法删除--他们是集成的部分宏可以来供你来使用。这些节点是:
宏里:表示在信息流出到宏世界以外的地方
宏外:宏世界的计算结果返回到当前父世界里
宏配置:提供一个宏的描述,以及信息,如作者姓名
宏参数:这是四个宏里最复杂的节点,参数节点允许外部用户进行交互并更改宏内的节点网路设置,而不必打开宏来修改它。这是一个非常强大的功能,以至于下面几个章节将致力于描述如何使用此功能。
这四种节点是一个门户宏,外部世界和内b部世界之间的信息交流都可以通过该宏。您可以配置它们以同样的方式与任何其他节点–通过双击他们。
端口
Macro In和 Macro Out节点控制宏上的端口。他们是完全相同的,但事实上,一个是用来输入;另一条向外输出的。

向宏添加另一个端口,只需单击"Add New Port"。然后,您可以给它任何想用的名称来形容它的作用。
同样,要从宏中删除端口,可单击该条目旁边的删除按钮,标记为删除。当你单击"确定"对话框时将删除该端口。
该"Settings"按钮将显示一个对话框,允许你去配置此端口。

最主要的决定是接收什么类型的数据端口。默认值是高度场数据,但你可以设置将数据类型转换为位图、文本或接收任何类型的数据。同样你可以标记一个端口"optional(可选项)"。 一个正常的端口对于操作宏是必须的。如果正常输入但未连接,则该宏不起作用。一个可选的输入操作意味着端口不是绝对必需的。一个标准的使用可能是,例如,对于一个输入允许用户覆盖默认地形使用内部的宏,或凭借此宏指定一个可选的遮罩,这仅仅适用于确定的区域。对于输出,可选的标记通常是用来表示一个辅助输出;可能一个俯视遮罩对于纹理或一些其他是一个有用的,但结果对于宏是不必要的
宏配置

参数
参数是宏最强大的方面。9。3节将深入研究他们的细节;
在这里我们只关注我们自己的实际选项在对话框中所示。参数装置看起来像:
参数装置如下:

从上可以看出,从主要宏参数屏幕上,你可以执行以下操作::
1)添加新参数。 点击"Add Parameter(添加参数)"按钮来添加一个新的宏参数。然后,你将会出现一个你希望创建的参数的类型的选择。
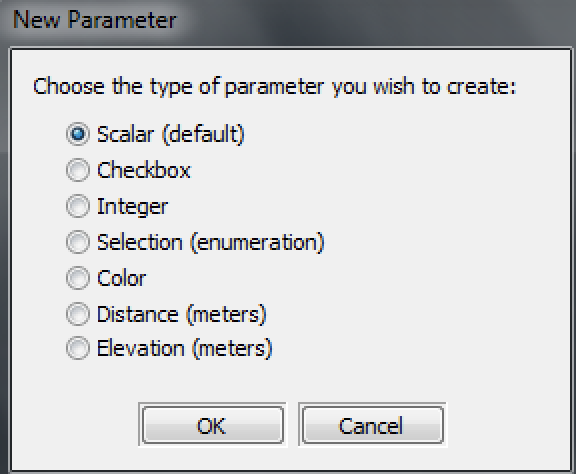
默认参数类型是一个标量,这可以直接用于调整World Machine中的任何的节点参数。然而,一些其他的类型也是可能的,这并将取决于宏的目的,对于参数类型的完整讨论,请参见9。3节。
2)改变参数的当前值。 调整滑块或输入一个新值,这是完全等同于对外部节点的宏做同样的事情。
3)重命名一个参数。 这很清楚!
4)参数标记为删除。 像端口节点,当你点击对话框中的“OK”时仅删除参数。
5)任何先进的配置选项,都需要为每个参数配置工具提示。

对于每个参数,可以指定显示的帮助文本如果用户将鼠标悬停在参数。工具提示文本应有一或两句话,让用户有更好的想法,对于参数的调整来做些什么。
在此对话框中的其他部分只适用于特定类型的参数:
选择
● 您可以添加、编辑或删除选定条目。在这里你添加的每个条目将显示为一个选项来选择从列表框中的宏中。
整数
● 您可以指定最小值和最大值的整数控制参数的范围。
更多细节见9。3。3节有关这些类型参数的使用。
宏参数系统
了解宏参数的方式,标量网络和节点参数是至关重要的,它能够创建有用且有效的宏。
节点参数输入:
回到我们在1节中提到的节点的顶部的参数输入端口。他们基本在宏的控制参数内。当选择一个节点时,出现这些,你可以看到下面的差异:

简单参数
在这种情况下,你在宏里操作的参数是直接连接到内部节点的参数。这是因为如果用户可以直接进入节点的宏并且调整。对于理解使用宏参数这是最简单和最容易的方法。

创建一个简单的参数,创建一个标量参数,如9。2。5,命名它为你希望的。
在你单击OK之后,宏参数节点将有一个新的输出端口。简单的连线到要更改的参数的参数输入端口的端口。
注意,线,带标量或参数的数据是橙色的,而不是黑色。每种类型的数据,它放在网络上有不同的电线颜色色码。未来的任何数据类型添加到WM中同样会有不同的链接颜色。
标量节点网路
有时你想做的超过可能的简单的参数。例如,您可能要在同一时间调整两个相关参数,当用户调整一个控制时。这是标量节点网路的解决方案。

由参数操作菜单栏进入标量节点。他们也是部分工具栏上面所示的淡蓝色背景中的节点。
从左到右,他们是自动化标量,标量生成器,标量钳,标量逆变器,标量算法,标量组合器,组选择器,整数发生器,变换,失真发生器和整数。

以上是一个典型的标量节点网络。 它正在做什么?
1)标量生成器创建一个数字,例如。35。
2)标量钳重新缩放值的范围。因此,一个0。0输入到钳中可能会成为一个。25,一个1。0输入可能成为一个。75。 我们的值。35将根据这些新的区域调调–所以它将成为0。425。
3)标量分离器有多个输出端口,以便你可以使用多个参数的值
4)标量值是被连接到简单的转换装置,控制Canyonize和冰冻世界参数。
这样的效果是,现在调整控制时调节了两个参数而不是一个–调整器限制在一个较小的范围。在标量网络中添加更多的节点,我们能控制更多的参数,或让他们改变不同的互相关注。
正如你可能已经知道,标量网络有很强的数学性质,可能相当复杂。大多数的挑战在于计算出不同的驱动方式参数随着最为标量生成器输出的变化而变化。
最后,请注意,您可以替换网络中的标量生成器与宏参数的输出节点。二者是可以替换的。
非标量参数
并非只有标量参数有数据类型,你可以从宏中驱动:
布尔
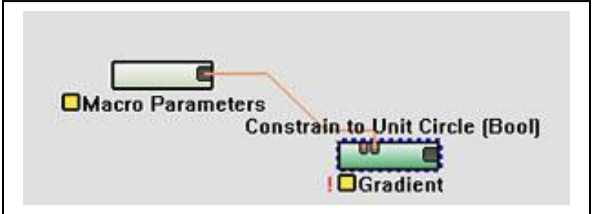
一个Boolean(复选框)参数应用于当你想开一个Boolean类型的节点参数。上文所述,使用一个布尔驱动"Constrain to Unit Circle(约束的单位圆)"参数在Gradient节点上,可以看出(Bool)参数名称的正确,接受一个布尔参数。
整型

整型宏参数是有用的用于驱动节点的整型参数输入端口。一个整型参数被用来驱动"Number of Terraces"参数在Terrace节点上。
请注意,正如上文所示,为了使用一个整型参数,你必须推动"Config"按钮在宏参数对话框里,并设置可以承受范围的整型值。
选择
选择参数的核心是基本上是一个整型数。但是,每个值(0.1.2等)被标记。World Machine然后向用户提供标签的列表,并允许用户选择。在与Bank选择器一起使用时,(见下文),选择参数变得极其有用。
选择器
Bank选择器是一个功能强大的实用节点设计参数。其目的是让你驱动许多标量值与单个参数的输入。这样做使你可以设置"Styles"在你的宏内,因此与从一个简单的列表框的选择,用户可以立刻更改((隐藏)许多参数。
Bank选择器由"tabs"和"variables"组成。每个变量都有Bank选择器上的输出端口,并将输出一个标量值,反映其当前值。一个选项卡包含一组所有变量的值。因此,通过选择不同的选项卡,你可以从根本上改变一系列参数,用户不必去接触。
如下对话框所示:
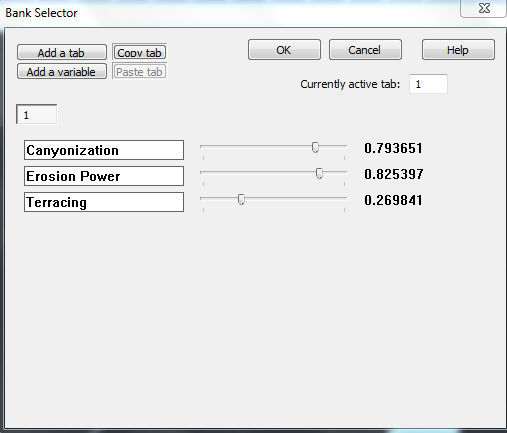
这里有6可以在此对话框中执行的操作:
添加一个变量中:向Bank选择器中添加新的变量。每个变量可以被命名,而且驱动单一标量输出值。
添加选项卡:此选项将创建一个新的所有变量的值的组
复制选项卡:从当前选项卡复制变量配置
粘贴选项卡:粘贴存储的变量配置到当前选项卡
变量名称:键入一个名称到变量配置的空白区域
调整变量的值:调节滑块去更改应在当前选项卡的变量的值
更改标签:调整要修改的选项卡通过单击滑块上方的编号按钮。按钮的数量将取决于你创建了多少选项卡。
参数输入到Bank选择器选择当前选项卡,可以是一个整数或一个选择–推荐后者。
使用带有宏的高度域多效节点
多效节点就是那些不直接影响地图的内容;相反,他们通常会影响在网路中高度域的流动。
下列效用程序节点是有用的在宏内部去帮助指导数据流:
拉阻节点

Pull-up节点的功能是如果未指定,提供一个默认的高度场。要做到这一点,连接你的引用(默认)高度域去引用输入,如上所示。然后可选的高度域被重写输入。
如果重写输入被连线,它会一直沿着高度场。否则,它将一直沿着引用输入。
装换节点
装换节点允许你控制哪些高度场与一个参数传递到输出。
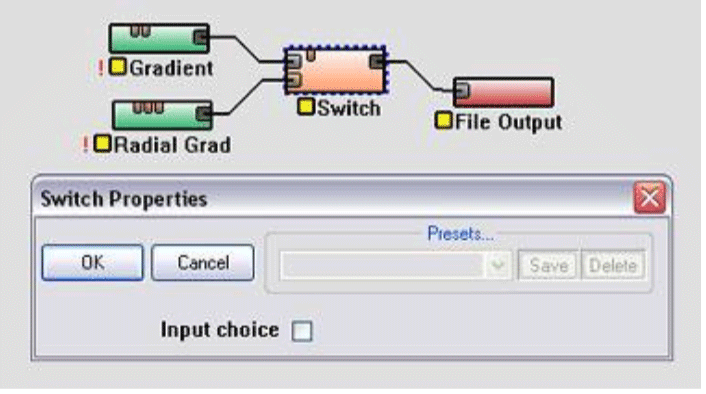
根据"Input choice"复选框参数的值,在上面的示例, Gradient 或 Radial Gradient将传递给File Output节点。
多分离器&;多选择器
多分离器和多选择器被设计成允许你发送地形数据,仅仅只能是多个宏路径中的其中一个。你可以设置输入或输出的最大数量,以及通过参数控制所选的输入或输出。

这种功能对于宏是非常有用的,它可能有几个不同的效果路径,特别是在你可以允许用户只能选择一个时,如上图所示。请注意,当前被选定的路径不能被创建(它们是红色状态图标)。这些路径节省了的生成的时间和内存!
专业品质宏的指南
一旦你理解了概念,就比较容易创建宏了。然而,创建专业品质的宏是要有一个与众不同的的模式的。有许多微妙的不易显示和明显的设计元素。下列准则是一个良好的起点。
有限焦点
第一准则是非常简单和最重要的。那些最成功的宏是明确和有针对性的实现确定的效果。不要做太多的宏,这会变得过于复杂,但当你拿不准的时候就它失去了让宏特别的可重用性。试图执行许多任务时创建多个宏可以串在一起而不是一个整体。
使用正确的参数数量
这也许是最经常被忽略的宏准则,结果可能是灾难性的。这有两个方面的犯错:
参数太少是不太常见的问题。它发生在非常重要的或必要的用户控制被忽略的接口时。对一个专业的宏的渴望是对很多人有用的,对于那些关注手边的工作的人;这意味着,有一个宏,你经常需要打开和更改宏世界中的东西,这样就适得其反。
在另一方面,一个更常见的错误是向用户公开的参数太多。大多数宏创建者的第一个冲动是包括尽可能多的参数,总在假设越多控制的越好。问题是向用户展示一个搭大杂烩的选项,特别是当他们没有描述性名称或更改输出难以捉摸!你添加的每个参数需要注意,用户可以给任何特定参数。怎样在做多的参数中很容易淹没了极为重要的参数。
最好的宏会在调整能力和可用性之间取得平衡。对于每个参数,问问自己如果该控件是一个重要的除了宏的整体操作外。如果你不能回答,那么不提供该参数!最新研究表明,人类可以保持4和7之间'chunks'同时在他们的头脑中。记住这一点,这似乎是最好的数量限制。
参数的数量减少的另一个方法是使用标量节点网路或Bank选择器一次对多个参数进行调整,这仅仅是控制宏本身中的单个参数。关于他们的更多细节见4。3。4节。
使用正确的参数
在版本0。99的World Machine中,只有标量参数的宏是可能的。这导致人们驱动一个整型标量参数,甚至是一个布尔标量参数。这既无效率也非常的迷惑用户,他希望能顺利更改设置一个标量,而不是看到输出突然就从设置设置!
规则很简单:如果一个节点使用一个整数参数,驱动一个整数,而不是一个标量。同样对于布尔值也一样。
只允许有效的参数范围
这可能是第二个最常见的涉及宏的错误。一个标量的有效范围为0。0到1。0。如果特定的效果是唯一真正有用的在0。2到0。5的范围,然后为什么让用户在这个范围以外?它比准许更容易混淆。使用标量夹节点要改变0到1范围的宏是非常有用的对于你想创建的范围。
如果在某些时候在一定范围内你有有效的参数,一个更好的选择是使用Bank选择器节点安装组的变化,根据你的宏中的列表框参数的设置。这允许你在不暴露他们,用户并有可能导致混乱的情况下更改需要更改的参数。
使用bank选择器!我不是开玩笑
这个新的World Machine已经多次提到了这些准则,仅仅因为他们这种简化对用户体验的影响是为其它复杂的宏。列表框是一个容易和标签的方式为用户与宏中间进行交互。去这里看看有关如何使用这些节点的详细信息。
短路时未发现的可能选项
如果你有多个不同的路径通过宏世界的内部,评估所有的节点都是奢侈的。这些尤其如此,例如,如果你有一个参数,该参数允许用户选择两种不同浸蚀节点。一个天真的操作是计算两个节点,然后选择在他们之间结束。
相反,你可以停用不采取这些路径!这样你可以节省处理的时间,不再创建建这些路径的内存。这是特别重要的宏,它将使用高分辨率,为一组节点使用的内存可能通过这之间,可以在一台机器上创建一定数量的RAM,没有什么不可能。
有关详细信息,请参阅9。4。3章有关使用多合成器的组合来完成这个。